Photos
- Photograph all roof slopes. This is for reference. Include at least one in your report. Photos taken from low, looking up, or photos taken across the roof, are better than photos taken from the ridge.
- Take photos of roof sections approx. 2’x3’ that show the average condition of the roof. If it varies with roof slope, shoot however many you need to record the different conditions.
- Photograph examples of defects (including sealant instead of flashing). Newbies tend to shoot too close. You need to be back far enough for visual reference but close enough to see the defect details.
- Hold the camera horizontal or vertical, don’t tilt to the angle of the roof.
Start at/near the eve. Walk parallel to the eve. Look at sections of roof as you go, areas approximately 10’x10’. Check the gutters as you scan the roof. Look for:
Installation
- Minimum Slope
- 3&12 (2015 IRC 905.8.2)
- 4&12: (NRCA pg. 550)
- 4&12: (Cedar Shake and Shingle Bureau)
- Spaced sheathing should be on the same centers as shake exposure.
- Felt interlayment, not underlayment (none should be visible in the finished roof)
- Exposure: 18” shakes- 7½”,24” shakes- 10”
- The starter course should be doubled.
- Spacing between shakes in the same course: 3/8-inch to 5/8-inch.
- Minimum shake width: 3 inches
- Minimum sidelap at adjacent courses: 1½ inches
- Overhang:
- at eve: 1½ inches
- at rake: 1 inch
2 nails per shake only
- ¾-inch in from edges,
- 1½ inches above exposure line.
- Fastener type:
- Stainless steel within 15 miles of salt water.
- No visible interlayment at finished roof!
- Hot dip galvanized nails only, no electro-galvanized!
Condition
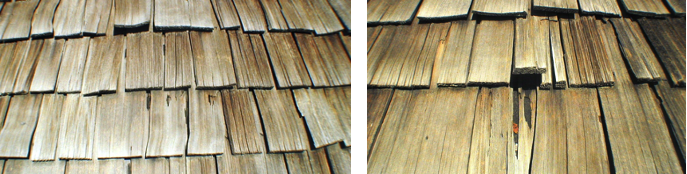
- Curled shakes
- Splitting
- Erosion
- Missing shakes
- Loose shakes
- Biological growth
- Exposed fasteners
Flashing
- All sidewall flashing should be step flashing EXCEPT! In areas designated “high wind” (Broward, Miami-Dade counties in FL), continuous flashing may be required by the AHJ.
- Counter-flashing properly installed.
- Proper penetration flashing
- Plumbing vent pipes: proper installation and rubber boot condition.
- Combustion vents
- Attic ventilation devices should have screens.
- Dryer vent
- HVAC intake and exhaust
- Misc. vents (bathroom, laundry exhaust fans, etc.)
- Chimney flashing and counter-flashing
- Valley flashing
- Identify type of valley (open or closed)
- Comment on any roll roof open valley linings
- Check the potential for cross-wash.
- Kickout flashing with sealant.
- Roof-edge flashing
If you can’t/don’t walk the roof:
- Get photos of as many slopes as possible. You can see more of the roof from farther away. Rest your camera on/against something stable and zoom in.
- Get medium and close-up shots however you can.
- View the roof from a ladder at the roof edge, other parts of the home, hillsides or any other vantage point you can find.
- Try using binoculars even from the roof edge.
- Consider using a telescopic pole to take photos of portions of the roof that are difficult to see. Some inspectors are now using drones with cameras attached.
Aging/Failure Characteristics
Curling: Some shakes will curl over time and curling often appears in patches on the roof, indicating that some shake bundles are made up of shakes predisposed toward curling. Curling seldom causes leakage.
Splitting: As time passes, moisture cycling will cause shakes to develop splits. Small cracks appear first at the tips of butts and over time propagate upwards, eventually developing into splits that extend clear through the shake along its length. A split caused by natural weathering will be the same color as the rest of the shakes, typically grayish brown, and will have smooth, rounded over edges.A split with causes other than natural weathering, like hailstrikes, will be orange in color and will have sharp edges.
Erosion: Erosion it typically caused by flowing or dripping water. The source may be an overhanging gutter or downspout, or even runoff falling from the butt of an overlying curled shake.
Decay: Decay typically develops first in shake butts, since this is the thickest part of the shake and holds moisture like a sponge.
Displacement: Over time, thermal cycling causes metal fasteners to expand and contract. This enlarges the holes in both the wood shakes, and in the substrate to which they are fastened. At the same time, moisture cycling causes shakes (and eventually the substrate) to expand and contact further degrading the connection between fasteners and wood. This overall degradation of the fastener connection reduces the resistance of the roof to wind damage.
Ridge and hip cap shakes are typically the first to be lost, followed by field shakes near the roof corners and ridge.
Roof Sheathing
Solid sheathing: can be used under shakes and shingles and may be required in areas subject to seismic activity or when treated shakes or shingles are used.
Spaced Sheathing: Both shakes and shingles can be applied over spaced sheathing, with 1x4 being the minimum size. Where 1x4 is used on 10-inch centers, an additional 1x4 should be installed between sheathing boards. Roofs covered with shakes are usually sheathed with 1 x 6 boards. In most places, in newer construction the maximum gap allowed between boards is 3 ½ inches.
The distance from centerline to centerline of the sheathing boards should match the weather exposure of the shakes.
Interlay VS Underlay
Wood shakes should have interlayment installed instead of underlayment. Interlayment consists of #30 black felt on rolls 18 inches wide laid over the top portion of course of shakes and extending onto sheathing. No felt should be visible at vertical joints in the completed installation.
Types of Shakes
- Handsplit shakes have a split face and sawn back and are tapered.
- Tapersawn shakes are sawn on both sides like a shingle but have a heavier butt like a shake.
- Medium and heavy shakes are available, medium being typically thinner than ¾-inch and heavy being thicker. Shakes are available in 18" and 24" lengths and longer for historical applications
Split Shakes:
- Tapersplit- tapered from butt to tip
- Straightsplit- no tapered
GRAIN TYPE
EDGEGRAIN (best)
Edgegrain shakes and shingles have tight, straight grain.
Edgegrain shakes and shingles are cut perpendicular to the growth rings.
In edgegrain shingles, the grain is allowed to slant a maximum of 45° from vertical. Edge grain shingles are the most stable over time and will offer the greatest resistance to wind and impact damage. Of the three different types of shakes and shingles, edgegrain contains the most heartwood. Since it’s the extractives in heartwood that help red cedar resist attack by decay fungi, edgegrain is the most resistant to decay. Extractives are chemical compounds in wood cells that help determine the wood’s permeability to liquids. They also influence the properties of wood like color, density, hardness, compressive strength, and resistance to attack by insects and fungi. Premium grade shakes and shingles must be 100% edgegrain. Bundles of #1 shakes and shingles may include up to 20% flatgrain shingles.
FLATGRAIN (worst)
Flatgrain shakes and shingles are cut approximately parallel to growth rings, with the grain oriented horizontally when you look at it from the butt end. The face of the shingles shows very wide grain with a fairly obvious centerline, as you can see 2here.
Because this type of shingle exposes the most sapwood to weather, it’s the least stable and most likely to check, split, erode or distort. "Checking" is cracking which doesn’t continue clear through the shake or shingle.
Flatgrain shakes and shingles are likely to split along this centerline during natural weathering.
Flatgrain shakes and shingles are also more likely to suffer from erosion since they expose a greater proportion of sapwood, which is softer than heartwood and has fewer extractives, so flatgrain shakes and shingles are also more likely suffer damage from erosion and wood decay.
SLASHGRAIN (uncommon)
Slashgrain shakes and shingles are also cut perpendicular to the growth rings, but at an angle of more than 45° from vertical when viewed from the butt. Grain on the face of the shingle may appear wavy. Because the angle of the cut exposes more sapwood than edgegrain shingles, slashgrain shingles are less stable than edgegrain and more prone to checking, splitting, erosion and distortion.
Shake Grades
Shakes come in three grades: Premium, #1, and #2, with premium being the best. Premium Grade shakes are 100% Edge Grain, 100% heartwood, and 100% clear and are cut from the best wood.
# 1 shakes are Clear heartwood, with a maximum of 20% Flatgrain. They are cut from lower quality wood than Premium shakes.
Number 2 shakes are cut from even lower quality wood or are rejects from number 1 wood. They’ll have a larger percentage of flat grain and will have some defects like sapwood, bark, knots, or decay. Number 2 shakes should really not be used on anything but a barn or outbuilding. The exposure should also be reduced when #2 are used.
Flashing
All flashing installed should be installed in a manner that will keep runoff on the surface of the shakes.
- Sidewalls should have step flashing (except areas designated “high-wind”).
- Valleys should be lined with #30 felt minimum under metal (may vary with jurisdiction).
- Valley flashing minimum width less than 12:12: 20 inches (2015 IRC 905.7.6).
- Valley flashing minimum width 12:12 or steeper: 14 inches (2015 IRC 905.7.6).
- Valley flashing minimum width 24” (20127 NRCA pg. 584)
- Valley flashing minimum width 22” (Cedar Shake and Shingle Bureau)
Ice Barrier
Some jurisdictions require an ice barrier consisting of self-adhering, self-sealing waterproof underlayment to be installed at the roof edge to a point 24” inside the exterior wall (measured level) where the average January temperature is 30° F or less (25° F in some jurisdictions).
Making Recommendations
Always recommend a qualified roofing contractor for repairs, corrections or maintenance, and make sure your client knows that all roofing contractors will not be qualified.